 |
| No-Sew Button Ornament |

6 pack of styrofoam 2" balls $3.47 (i also got a few 4" balls but i think they would turn out too heavy for a tree)
6 packs of buttons $5.66 each (i lucked out and found packs with just red and green buttons. this project would definitely be more cost efficient if you had buttons on hand)
2 additional packs of just red buttons $1.97 each
Red ribbon $1.97
100 white sewing pins $2.97
Hot glue gun & extra glue sticks $3.47, $2.97
since i just had a picture to go by, i kinda just played around with the button placement and how i wanted it to look for spacing. i ended up pinning a few large buttons to the styrofoam ball and then using smaller buttons to fill in space


once i had most of one side done,

i used my hot glue gun to attach the red ribbon (note: it's best to use the hot glue gun as it's heating up on the styrofoam as opposed to waiting until it's been on for a while. the styrofoam tends to get melty when the glue is really hot)

i glued down both ends of the ribbon, making sure they were as close to each other as possible so there wouldn't be any white showing. i then placed large buttons on either side to make sure everything held up. for most of the large buttons, i doubled stacked using a smaller button on top and also didn't use two pins for every button (mostly to conserve pins and also because it felt like it took away from the Christmas colors). i also tied a bow around the base where the hanging ribbon was attached because all Christmas ornaments need big bows, right? i love how it turned out, and i think it will look great on a tree! with the 2" ball, it didn't turn out very heavy. i would think that if you used a 4" ball, you wouldn't be able to hang it on a tree due to the weight. here is the finished ornament:
 |
| front |
 |
| back |
as much as i love it, i don't think i want to use this style for the ornament exchange. it took A LOT of buttons and also i wanted to do something a little more personal. for Audrey's ornaments for the exchange, i'm going to attempt to get her hand prints on the sides of a glass ornament with a little help from Will's sister, Ann. we have a pinterest ornament party scheduled for tomorrow, yay!
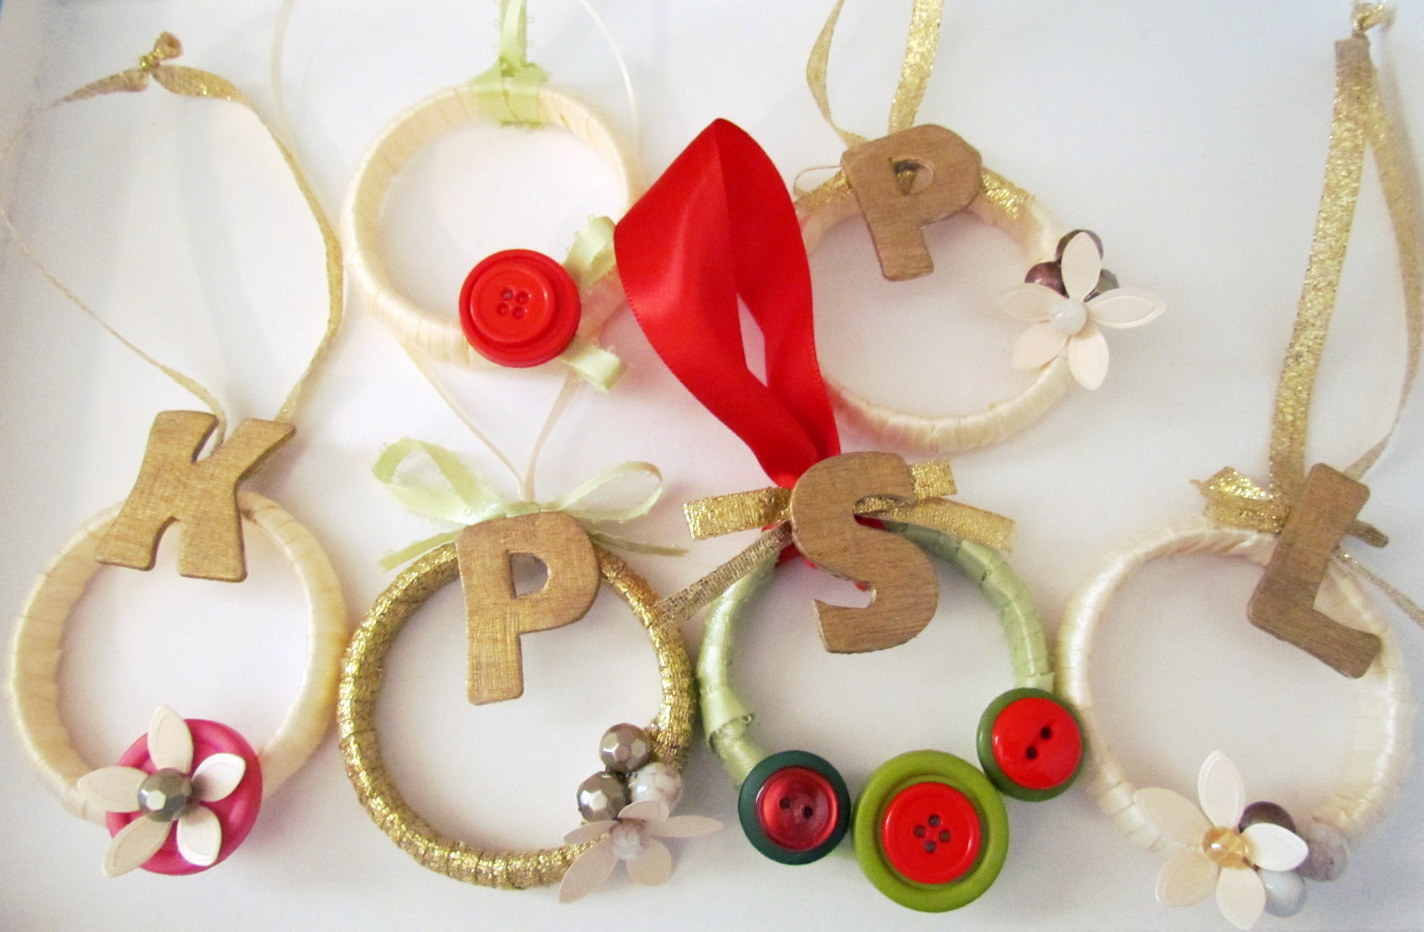
with this in mind, i moved on to inspiration #2, which i borrowed from blogger Sarah Ortega. she has a tutorial for her shower curtain ring wreath ornament which i loved! it's very cost efficient and there are endless possibilities to personalize it and add your own creativity. here is how i made mine:
 |
| Shower Curtain Ring Wreath Ornaments |
12-pack of shower curtain rings $1.16
9 rolls of cream satin ribbon $0.47 each
2 rolls of gold glitter ribbon $0.97 each
Misc. beads $1 per pack
Wooden letters (30 pack) $3.47
Painters pen in metallic gold $2.44

i connected the two ends of the shower curtain ring together and filled in the gap between the two sides with hot glue so that the circle wouldn't have a big dip in it. i wrapped the cream satin ribbon around the hot glue blob several times until it was even with the outside of the ring. from there, i wrapped the ribbon around a few times in each section to make the ring look more full and textured, putting a dab of hot glue down about every half inch to make sure the ribbon stayed in place. once i came full circle, i hot glued the end of the ribbon down on the back side.

now for the fun part! here is where you can get creative and decorate your wreath however you like! i used these beads:

and leftover pearl paper flowers from my wedding crafting. i hot glued my design on the "fat" part of the ring (where the two ends connected and i had my huge blob of hot glue) to make my wreath look like this:

i would recommend using the "fat" part of the ring to add decorations because there is more space to glue and also it takes away from the lopsided look of the curtain ring. to add personalization to each of the ornaments, i used a paint pen and a wooden letter:


i also slightly distressed the wood using a sewing pin. i then tied a bow with the gold glitter ribbon and attached the bow behind the letter. i used the gold glitter ribbon for hanging and then hot glued the letter and bow to the base of the hanging ribbon:

it was so easy to make and i had so much fun, i also made a few for my friends. here is an "M" wreath for Melissa:


Opening season for ducks was yesterday morning so Will brought home a small bag of beautiful feathers for me to use (will update with these later, Audrey just woke up from her nap) and we also have duck marinading in the fridge for dinner tonight. Yum! i love the holidays and i kinda sorta love pinterest as well :)
apparently i'm not the only crafty one in the family this weekend. Audrey (13 months old tomorrow!) made a hand print turkey magnet for us in Sunday school this morning. her first piece of artwork -- aww!

No comments:
Post a Comment